From the beginning, Realvolve has incorporated contact filters to retrieve groups of contacts from the database. As new fields were added, we expanded the number of available filters to meet the growing need of the users. With the addition of several new fields, It has become necessary to expand the list of filters once again but there was a challenge… Where to place the filters?
There was simply no room to put the additional filters in the current list view without cluttering up the screen, so we took a new approach!
Instead of listing the filters in one horizontal line, we decided to expand downward to allow for more growth. In order to make the new design work, we needed to hide the filters until they were needed. We also decided to give the users the ability to save custom filters and reuse them in at any time.
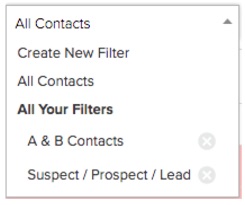
 We’re thrilled to announce that the NEW contact filters are ready and available for you to use! We’ve gone from having a list of 8 filters in a horizontal row to a dropdown menu, this allows you to “Create New Filter”, view ‘All Contacts” or select from a list of previously saved filters. You can create as many saved filters as want and delete them when they are no longer needed. This prevents you from repeatedly setting up the same filters so you can be more efficient by saving time.
Creating A New Filter
Select ‘Create New Filter’ from the dropdown menu to display the filter editor. Here you can pick from any of the previously available filters like Tag, Category, Record Owner, Record Type, Referrer, Source Type, Others and Date as well as some new ones like Contact Type, Relationship Scores, Stage, Status or Rent/Own.
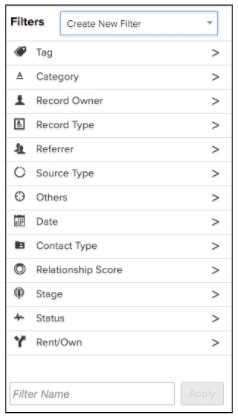
Selecting a filter type takes you to the a screen where you can pick the available choices for that specific filter type. Multiple filters can be used together and combined as one saved filter and used with one simple click.
Example Filter:
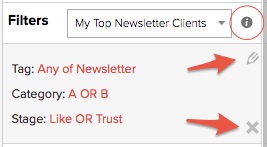
Here is an example filter of everyone in your database that is Tagged with ‘Newsletter’ and who are Category ‘A’ or ‘B’, in the stage of ‘Like’ or ‘Trust’. Notice that the selected items for each filter is summarized below the filter type.
Each time a new filter selection is added, the contact count is recalculated. Adjust the selected options at any time by re-selecting a filter type and the contact count will be updated along with it.
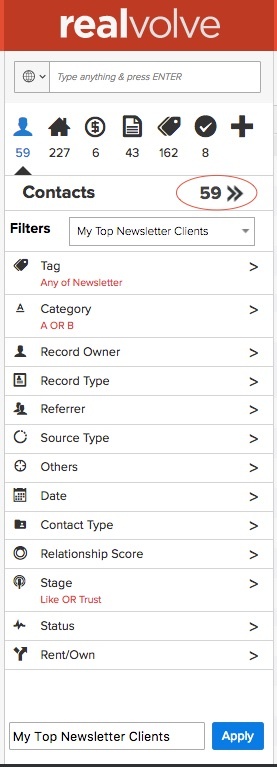
- Click on the double chevrons next to the count to view the list of contacts meeting the selected filter criteria.
- Add a filter name below the filter types then press Apply to use the filter later.
- My filter name is “My Top Newsletter Clients”
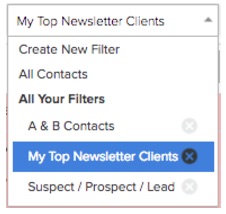
- When the dropdown menu is clicked, the new filter is displayed in the list.
- Select ‘All Contacts’ from the dropdown menu to view remove the filter and see all contacts in the database.
- Click the (x) button next to any unwanted filters to delete them from the list.
Selecting a previously saved filter then click on the (i) icon will to show the filter summary. Click on the Pencil icon in the upper/right corner of the summary to edit the selected filter criteria as needed or click the ‘x’ to close the summary.
Additional Resources
Video:
(Click here to watch the video)
Documents:
Contact Filters: New Filters and Improved Process
Performance Updates
- Team is currently working on great things!


